Learning how to thread a sewing machine correctly is an essential skill for any semester. The threading process consists of two parts. upper threading and lower threading. Properly understanding and executing these processes will ensure smooth and efficient sewing operations.
In this article, we will guide you through the step-by-step instructions for both upper and lower threading of sewing machine or how to thread a sewing machine, along with troubleshooting common threading issues.
The upper and lower threading of the sewing machine involves three main steps.
- Winding the bobbin
- Upper threading (thread guides, needle threading)
- Lower threading (Bobbin loading)
Before you start threading the lower part of your sewing machine, gather the following materials:
- Thread spool
- Bobbin
- Bobbin winder (if not built-in)
- Bobbin case (if not built-in)
- User manual (for specific machine instructions)
Search for the spool pin on your sewing machine. The spool pin is mostly located on the top of the sewing machine. The spool pin could be a vertical or horizontal rod on your sewing machine.
Insert the thread spool onto the spool pin. Your spool pin may have a notch or groove on the spool pin. If the spool pin doesn’t have any notch or groove then use a spool cap to secure your thread spool.
- Check if the thread is unwinding on the top of the spool.
- Check if it spins freely
What is a spool cap? How to use a spool cap on a sewing machine? Read the article How to use a spool pin?
Locate the thread guide on the top of your sewing machine also known as the upper thread guide. A thread guide is a small metal or plastic loop or hook positioned on the top of the sewing machine. The position of the guide depends upon the model of your sewing machine. It is usually located on the top of the sewing machine.
Take the loose end of the thread and pass it through the thread guide from the back to the front.
You must read the article about “how to use a spool pin on a brother sewing machine“?
Take the loose end of the thread from the thread spool and pass it through the small hole or notch on the bobbin.
If you don’t want to pass the thread from small holes or notch then you can wrap it around the bobbin a couple of times. This will secure the thread and prevent it from slipping during the winding process.
- Pre-threaded bobbins are available in craft stores
A Bobbin pin is a small pin mostly located next to the spool pin on the top of your sewing machine. Place the bobbin on this pin.
Once the bobbin is placed on the pin you need to slide the pin to the right of the machine. You will hear a click sound when it is slid to the right. After that click sound bobbin is ready to wound.
Press the foot pedal or the start button on your machine to begin winding the bobbin. Make sure to control the speed to achieve an evenly wound bobbin.
While winding keep an eye on the tension of the thread. It should be neither too loose nor too tight. Adjust the tension if necessary by using the tension control dial.
Continue winding until the bobbin is filled evenly. Avoid overfilling it, as it may cause the thread to tangle or jam during sewing.
Once the bobbin is filled, stop the machine. Cut the thread connecting the bobbin to the upper thread, leaving a tail of a few inches.
Some advanced sewing machines have sensors that automatically stop the winding. Slide the bobbin to the left and remove the bobbin.
Also, read how to transfer thread from cone to spool a complete guide.
Place the thread spool on the designated spool pin located at the top of the machine. As mentioned above ensure that the spool rotates freely.
Guide the thread through the thread guides. Look for the thread guides on the top of your machine.
After passing the thread from the first guide follow the directional or numbered arrow on the left front of your sewing machine.
Following the numbered arrows and going through the “U” shaped (first deep groove) area on your sewing machine pull the thread down and then up (to the second deep groove).
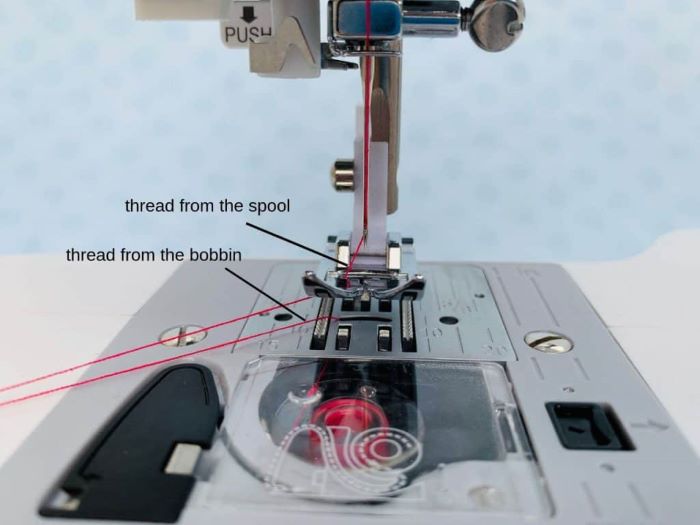
The takeup lever is one of the most compulsory components of each sewing machine. After you pass the thread “U” shape space. The next step is to wrap the thread around the take-up lever (See the diagram above).
You will have to wind the thread around the takeup lever and then down toward the needle.
What is the takeup level on a sewing machine? It is a movable lever usually located above the needle area (the second deep groove area). The takeup lever has a hole cut out near the top. The purpose of the take-up lever is to guide and control the upper thread’s tension and movement.
As you stitch, it moves up and down in sync with the needle. Its primary function is to pull the thread from the spool, ensuring it remains taut and properly fed into the machine.
Low to thread a sewing machine needle? The last step in the upper threading of the sewing machine is threading the needle. Hold the loose end of the thread between your fingers and carefully insert it through the needle’s eye from front to back.
If you’re having trouble threading the needle, you can use a needle threader—a small tool that assists in guiding the thread through the eye of the needle.
If your sewing machine has an automatic needle threader then use an automatic needle threader to thread the needle of the sewing machine.
- Before threading the needle raise the pressure foot lever to its highest position
- Thread the needle from front to back or left to right
The bobbin is located under the needle of the sewing machine. Open the compartment under the needle to access the bobbin case. Some machines have front-loaded bobbin options.
Once the cover is removed you can access the bobbin case and insert the bobbin into the sewing machine. What is a bobbin case? The bobbin case is a small metal or plastic device that holds the bobbin and is usually found beneath the needle plate.
Before inserting the bobbin pull the thread to unwind a few inches of thread from the bobbin. This extra thread will help you later in catching the thread.
Make sure to unwind a few inches of thread. If your thread is too little then it may not catch it later.
If your sewing machine has a removable bobbin case: Pull the loose end of the thread through the small slot or tension spring on the bobbin case. Then, slide the bobbin case back into its designated spot beneath the needle plate. Make sure it is securely in place.
If your sewing machine has a drop-down bobbin system: Insert the bobbin and to find in which direction will the thread go check the diagram on the compartment. You can also see the user manual for this task.
- On pulling the thread should unwind fairly easily
- Dont forget to close the compartment before sewing
Hold the upper thread with your left hand and turn the handwheel towards you (counterclockwise) with your right hand. This will lower the needle and raise the bobbin thread.
As the needle rises back up, a loop of the bobbin thread should appear through the needle plate. Gently pull the upper thread towards the back of the machine, which will draw up the bobbin thread through the needle plate.
To make it easier to start sewing, hold both the upper and bobbin threads together and move them toward the back of the machine under the presser foot.
You have now successfully threaded the lower part of your sewing machine. To ensure everything is in order, gently tug on the threads to make sure they are securely in place.
Threading a sewing machine properly is crucial for achieving high-quality stitches and smooth sewing operations. By following the step-by-step instructions for upper and lower threading, you can ensure that your machine functions optimally. Remember to troubleshoot common threading issues to avoid any disruptions in your sewing projects. After reading this article you will be able to know about the upper and lower threading of sewing machine.
Threading the machine correctly ensures proper tension and stitch quality, preventing issues like thread breakage or uneven stitches.
It’s recommended to use the same type and weight of thread for both upper and lower threading to maintain balanced tension and stitch quality.
Regular maintenance is crucial for the optimal performance of your sewing machine. Clean the machine after each project and oil it as recommended by the manufacturer.
Check for any thread snags or tangles in the upper thread path, rethread the machine, and ensure the tension settings are properly adjusted.
Ensure that the bobbin is correctly wound and inserted into the bobbin case. Adjust the tension if necessary and make sure there are no obstructions in the bobbin area.